Wednesday, January 30, 2013

Chicken & Broccoli Braid


This is definitely one of my new go-to favorites. This recipe is delicious! (Probably a thousand calories, but nonetheless, amazing!). My husband and I both absolutely loved it and will definitely be added to the regular recipe rotation. Hope you enjoy!

Ingredients:
2 cans Pillsbury crescent rolls
2 cups cooked chicken, cubed
2 cups shredded cheddar cheese
2 cups cooked, steamed broccoli florets
1/2 cup mayonnaise
1 egg yolk, lightly beaten
Rosemary sprigs, to taste

Directions:
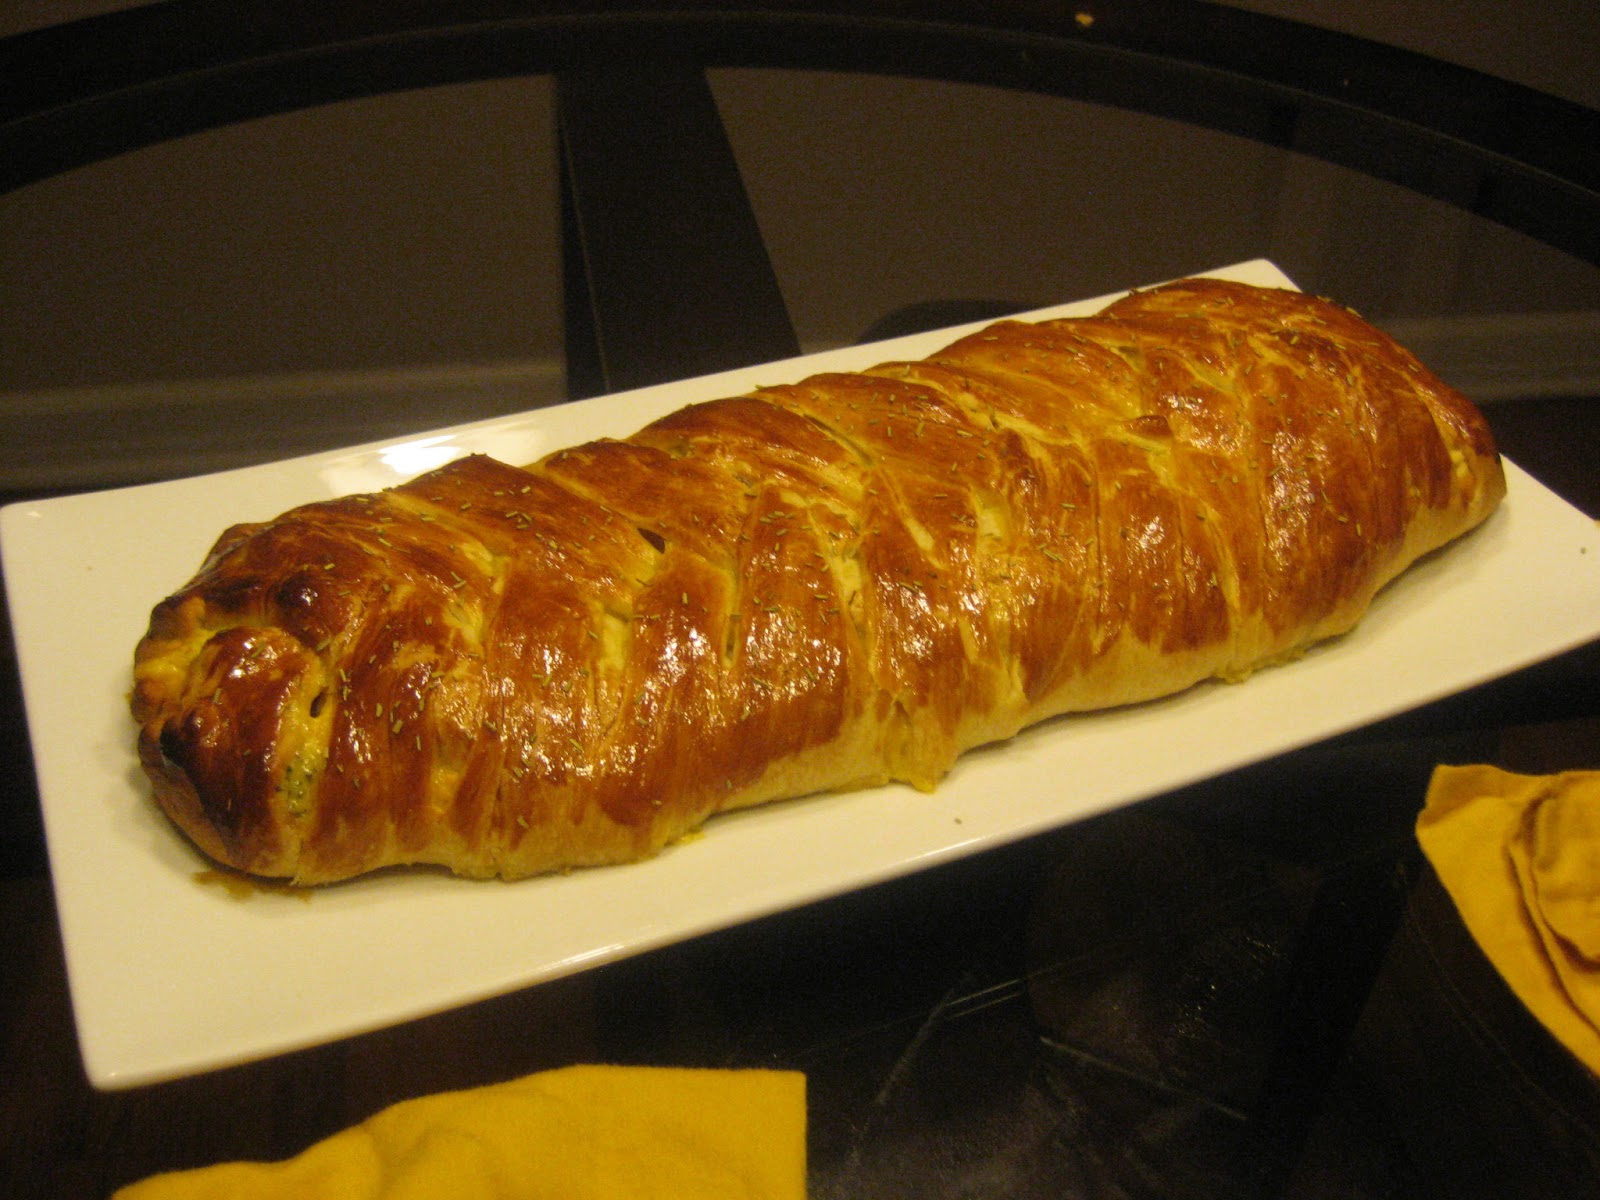
Preheat oven to 375 degrees. On parchment lined baking sheet, spread both cans of crescent rolls next to each other lengthwise to form a large rectangle. Press all seams together to form a solid surface. In a medium mixing bowl, stir together chicken, cheese, broccoli, and mayonnaise. Pour contents evenly over the center of the crescent rectangle all the way to the ends. Next, cut one inch thick strips down each side of the crescents, right up to the stuffing. To braid, simply reach one strip across the stuffing and tuck under, then repeat with each strip, alternating sides to form the braid. Brush with egg yolk, and evenly sprinkle the rosemary on top. Bake for 20-25 minutes, until golden brown and cheese begins to bubble. Enjoy!


Thursday, September 20, 2012

Salmon Pasta with White Sauce


If you like salmon, you'll love this recipe. The flavors of the lemon and yogurt really enhance the flavor of the fish. Just bursting with flavor! Hope you enjoy this one.

Ingredients for White Sauce:
3 cups plain Dannon yogurt
Juice of one lemon (approximately 3 TBSP)
1/2 cup grated Parmesan cheese
1/4 cup walnuts, finely chopped
1/4 cup fresh basil, finely chopped (1 TBSP dry)
1 clove garlic, divided
1/4 cup light olive oil


Directions:
With food chopper, chop walnut until very fine.


In medium sized mixing bowl, combine the yogurt, lemon juice, chopped walnuts, Parmesan cheese, pressed garlic, chopped basil, and light olive oil. Stir until combined. Set aside. 


Ingredients for Salmon Pasta:
1 lb farfalle pasta (bowties)
1 lb fresh salmon fillets
1 clove garlic
1-2 TBSP refrigerated pesto
Olive oil for brushing


Directions:
Preheat oven to 350 degrees. Brush salmon with olive oil to coat. Press garlic clove over fillets and spread around evenly. Evenly spread pesto on top of the garlic to coat.


Bake salmon at 350 degrees for 15-20 minutes, or until salmon flakes easily with a fork. Meanwhile, boil water and cook farfalle according to package directions. When salmon has finished cooking, slide spatula under salmon between the skin and the bottom of the meat and transfer to a plate (check bottom for any missed skin). Flake salmon with a fork and then transfer to the pot with the cooked, drained pasta. Pour prepared white sauce over salmon pasta and turn to coat evenly. Serve hot with shredded Parmesan on top. Enjoy!


Wednesday, September 19, 2012

French Apple Pie


This is truly an aware-winning recipe. No really. I've actually won awards with this one! :) Okay...so maybe they were just church function contests...but hey, I still won first with this one several times. It is the best apple pie you will ever eat and will make you a favorite with your friends. Enjoy one of my family's favorites!

Ingredients for Crust:
2 1/2 cups all-purpose flour (I love King Arthur-It's just great flour! But any will do!)
1 TBSP sugar
1 tsp salt
1 1/4 cups butter flavor shortening (like Crisco)
1 egg
1/2 TBSP white or apple cider vinegar
water

Directions: 
Mix flour, sugar, and salt with whisk until combined. Cut in shortening with pastry blender until mixture is in pea-sized crumbles. In 1/2 c. measuring cup, mix egg with vinegar, then fill with water until cup is full. Pour over shortening mixture. With wooden spoon or spatula, stir just until blended (don't over-stir, or your dough will get tough).

Heavily flour a sheet of parchment paper then dump dough onto surface. Sprinkle enough dough on top to keep rolling pin from sticking. Roll to approximately 1/2" thickness. Baker's Trick: take your rolling pin and roll up the dough onto the pin (parchment paper and all). Unroll over-top of pie pan, parchment side up. Then peel off parchment and voila, you have the perfect pie crust! Just trim off any dough that hangs over the edge, fold under to create a smooth top, the press to create the pretty, wavy edge. Note: save dough scraps to make a pretty decorative shape for the top (to be added at a later date)

Ingredients for Pie Filling:
8 medium sized apples (McIntosh are the best! But others baking apples, like Gala or Fuji will also work)
1 cup sugar
1/3 cup all-purpose flour
1 tsp cinnamon
1 tsp nutmeg
Optional: 1 tsp lemon juice to add tartness to apples

Directions:
Shave apples, then use your handy-dandy apple slicer to cut into wedges. Now take each individual wedge and cut into 3-4 smaller wedges. The thinner the better on these!


Put all your sliced apples in a large mixing bowl. Measure into bowl the sugar, flour, cinnamon, and nutmeg. With a spatula, gently turn apples to coat in mixture.


Now pour apple mixture over prepared pie crust! This is where I start preheating my oven to 425 degrees.

Ingredients for Crumble Topping:
1 cup flour
1/2 cup butter, room temperature
1/2 cup brown sugar

Directions:
Mix all ingredients until you have pea-sized crumbles. Evenly coat entire pie with the mixture. Now you're ready to bake! Place pie in pre-heated 425 degree oven. Bake for 10 minutes. After 10 minutes, turn oven down to 350 and bake for 50 minutes. During cooking, make a pretty decorative shape for the topper. I usually like to cut an apple shape, but if it's for another event, like Christmas, I'll make a holly leaf (pictured below), or another shape to fit the occasion. During the last 20 minutes of baking, place your topper on the center of the pie and place a crust shield over the edges to prevent burning. Once it's finished baking, let cool for 15-20 minutes, then serve. Enjoy!

Saturday, September 15, 2012

Cast Iron Pan Pizza


I saw this recipe recently on Pinterest and knew this was one I had to try! Josh and I love our homemade pizza (why would we ever buy Papa Johns or Domino's again when we can get double the flavor & yumminess and double the ingredients at half the cost?!). I personally am a deep dish girl, while Josh likes his hand-tossed. Still this was one we both agreed on as a definite do-again! The overall time is 3 hours...but wait! Before you stop reading my blog post here, let me put your mind at ease and tell you the actual prep time is only about 20 minutes (the rise time for the dough is 2 hours and 15 minutes). There, relieved? Well without further adieu, here is the recipe for cast iron skillet pan pizza amazingness!

Ingredients for Dough:
  • 1 1/4 cups lukewarm water
  • 1 1/2 teaspoons yeast (1 packet)
  • 3/4 tablespoon salt
  • 1 1/2 teaspoons sugar
  • 1/4 cup corn oil (preferably darker color, though any corn oil will do-I actually substituted with canola oil)
  • 1/4 cup extra virgin olive oil
  • 3 cups unbleached all-purpose flour
  • 2 tablespoons corn meal to coat the dough
  • Fresh ground black pepper, also for coating the dough
Toppings:
  • 14 ounces pizza sauce
  • 12 ounces shredded mozzarella cheese (plus additional cheese if you want)
  • Optional: 1 large, fresh tomato, finely diced
  • 1 teaspoon garlic powder (or 2 chopped cloves garlic; fresh garlic is always better if you have it on hand!)
  • 1 1/2 teaspoons oregano
  • 1/2 lb Italian sausage, 6 slices bacon, and/or 5 to 6 ounces sliced pepperoni (we're meat lovers so the more the better!)
  • 2 tablespoons grated Parmesan cheese
  • 8 to 10 ounces sliced mushrooms (I used green peppers!)
  • More cheese to top it all off
  • Additional pizza toppings as desired
Preparing the Dough:
  • In a large mixing bowl or stand mixer bowl if you have one, pour in 1 1/4 cups of lukewarm water. Add yeast, salt, sugar, corn oil, and olive oil and mix together with the water.
  • Add 3 cups flour and mix together thoroughly to create dough. I used my KitchenAid Stand Mixer with the dough hook for this step (it worked great and only took about a minute!). If mixing by hand, you only have to mix the dough for a few minutes; it does not require a long, tough kneading. The dough will be very wet and sticky, which is exactly how it is supposed to be! Cover the bowl with a damp cloth or towel, and let stand at room temperature for 2 hours and 15 minutes. 
  • At this point, just relax. Pull out your favorite book or pop in a movie. I actually went and watch my little sister, Bethany's volleyball game! 
  • After an hour and 45 minutes, when there are approximately 30 minutes left before the dough is ready, place cast iron skillet or pan (with a diameter of 10 to 12 inches) in your oven and preheat the oven to 500 degrees F. You don't have to grease or oil the pan in advance.
Making the Pizza:

  • As the oven and iron pan are heating, prepare your ingredients. You want to have your pizza toppings ready to be added to the pan while it is still hot (vegetables sliced, meats cooked and prepared if you use sausage, bacon, chicken or other meats).
  • When the oven and cast iron pan are at 500 degrees and the dough has risen for 2 hours and 15 minutes, it will be time to prepare your dough to go into the pan. Uncover the bowl and with your fist, gently punch down the dough to remove the gas.
  • Put out a flat baking sheet or just lay out a large sheet of wax paper on the counter-top and sprinkle it with about 1 TBSP of the corn meal and spread it around the surface with your hands. Add on a sprinkle of black pepper, to add spice to your pizza crust. Uncover the mixing bowl and pour (or dump) the dough directly onto the corn meal. Sprinkle the remaining 1 TBSP of corn meal on top of the mound of dough, and add a little more pepper to the top. This will provide a drier surface on the dough and allow you to knead the dough and work at it with your hands. You only have to knead the dough for a couple of minutes or so, to help condense it and remove the extra gas from the dough. Don't worry about kneading or rolling into a circle. Just knead the dough into a roughly rough and flat shape to fit the circumference of your pan. The resulting dough will be very spongy and moist – it will be far more thick than flat pizza dough. This dough will still rise in your pan when it cool.
  • Using heavy gloves or oven mitts, take the hot iron skillet out of the oven, and place it on your stove-top. Pour a little olive oil in the bottom of the skillet to coat. Then using a wooden spoon, pour (or dump) the dough directly into the cast iron pan. It will sizzle immediately when it hits the hot metal. Use the spoon to spread the dough around the pan as best as you can, forming a depression in the center with which to put on your pizza toppings, while forcing the dough towards the edges of the pan. Don't worry if the dough doesn't reach the edges of your pan; it will expand to completely fill your pan as it cooks. (Please be careful! – the cast iron pan is very hot) In this order, add your pizza toppings:
    • Spread a thin layer of olive oil on top with basting brush
    • Tomato Sauce (if using)
    • Mozzarella cheese (plus other cheeses mixed in, if any)
    • Tomatoes – spread them around over the cheese
    • Garlic, oregano, and Parmesan cheese
    • Mushrooms/Green peppers
    • Any meats being used (sausage, bacon, pepperoni, etc)
    • Extra cheese on top
  • With your heavy gloves or oven mitts, place the whole pizza into the oven. Bake for 30 minutes at 500 degrees. Remove from the oven and place the cast iron pan onto a trivet, cooling rack, or stove-top. Let the pizza cool off and settle for 10 to 15 minutes before serving. Enjoy!
 

Wednesday, August 1, 2012

Baklava

photo credit to Food Thinkers Recipes

Ingredients: 
16 oz  filo dough (or "phyllo;" not sure why there are two spellings, can anyone enlighten me?), room temperature *Keep in mind it takes about 2 hours to thaw completely  
1 stick unsalted butter, melted
4 cups walnuts, finely chopped
1/2 cup granulated sugar
1 tsp cinnamon
1 cup honey
Zest of one orange (Some people use lemon zest, but I love the taste of the orange!)

Directions: *40 layers of pure yumminess*
First, mix chopped walnuts, sugar, and cinnamon in medium mixing bowl. Set aside.

 Photo credit to Jeremy Carlisle

*Note: Keep filo dough covered with a slightly damp cloth at all times when not being used to keep it from drying out*

Carefully peel one sheet from stack of filo dough (it tears and rips very easily, so be very gentle) and place in bottom of ungreased 13x9 pan (don't use a non-stick pan because you'll need to cut these later and can scratch the pan). Brush very lightly with melted butter. Be careful here because you don't want to drench the filo. Continue this for 10-12 sheets. Cut away any filo that has "mounted" on side of pan. You don't want the build-up. It will cook unevenly and not look as pretty on final product.

Photo credit to Jeremy Carlisle 

Next, evenly sprinkle 1/3 of the walnut mixture on top of the layered filo dough (approximately 1 1/2 cups). On the next layer of filo, you'll use 8-10 sheets, lightly buttering in between each. Top with 1/3 of the walnut mixture. Add another 8-10 sheets, buttering in between each. Top with the last third of the walnut mixture. Your top layer will be as thick as the first: 10-12 sheets, buttered in between each. 

Preheat oven to 300 degrees. To cut the baklava, score the top to approximately 1/4" thickness in a diamond pattern. The way I do this is cut straight across the width of the pan in 2" sections.Then cut diagonally matching the corners on the top of the pan with the corner of the bottom. That sounds confusing! See picture. (I'm still not very good at this, don't worry, but it gets easier with practice :) And no matter how it's cut, it will still taste delicious! Once the baklava is scored, bake at 300 for 60-70 minutes or until lightly golden. Remove from oven and cool for 10 minutes. Meanwhile, heat honey and orange zest over low heat until warm. Cut baklava according to your guide. Pour honey mixture evenly over cooled baklava. Serve hot or cold. Enjoy!


P.S. Sorry for lack of pictures to go along with the instruction...was in a little bit of a hurry. Next time I make this I'll take lots! :)

Sunday, July 1, 2012

Chicken Bryan


For those who have been to Carrabba's, this is their signature dish. This juicy grilled chicken is topped with tangy goat cheese and lemon butter sauce mixed with sun-dried tomatoes and fresh basil. The blend is mouth-watering and sure to be a favorite! I hope you enjoy it as much as Josh and I did.

Ingredients:
2 boneless skinless chicken breasts, halved width-wise
Salt & cracked pepper to taste
Olive oil
4 ounces goat cheese
Sun-dried tomatoes
4-8 Tbsp. fresh basil, chopped
2 Tbsp. Vidalia onion, minced
2 Tbsp. garlic, pressed
8 Tbsp. butter, divided
1/2 C. white wine (I used Sauvignon Blanc; any white wine would do though)
3/4 C. fresh lemon juice (about 2 large lemon's worth)

Directions:
1. Brush chicken on both sides with olive oil, season to taste with salt & cracked pepper.
2. Grill chicken until done (internal temp of 165F). [I don't have a grill, so I baked mine at 375 for 15-20 minutes turning once halfway through]; Be sure not to overdo chicken! Juicy chicken is really important for the overall flavor.
*Meanwhile prepare lemon butter sauce:
3. Sautee onion and garlic in 2 Tbsp. butter until soft and fragrant.
4. Add white wine and lemon juice, reduce heat to medium-low and simmer 10 minutes to reduce.
5. Add remaining 6 Tbsp. of butter, a little at a time, until it melts and mixture is emulsified (blended together)
6. Add chopped sun-dried tomatoes and basil, heat until hot (be sure not to overheat or the sauce may break)
7.  Top chicken breasts with 2 oz. each of the goat cheese until cheese warms and softens
8. Spoon lemon butter sauce over chicken breasts.

I served this meal with garlic red-skinned mashed potatoes, hummus and pita petites. Yummm! Another variation would be to serve the chicken over pasta tossed with butter or olive oil. Enjoy!


Thursday, January 19, 2012

White Chocolate Cupcakes with Truffle Filling

Bite into a sweet little surprise with these truffle-filled cupcakes!


Prep Time: 25 Minutes   Total Time: 1 Hr, 15 Min.    Yield: 12 Cupcakes


Cupcakes:
1 3/4 c. cake flour
2 tsp baking powder
2/3 c. whole milk
1/2 tsp. double-strength vanilla (1 tsp. vanilla)
4 egg whites, room temperature
6 TBSP butter, softened
1/2 c. granulated sugar
1/4 c. sour cream
12 round white or dark chocolate truffles, unwrapped


Frosting & Garnish
6 oz. white chocolate, chopped
1 pkg. (8 oz) cream cheese, softened
1/4 c. butter (1/2 stick), softened
1/2 tsp. double-strength vanilla (1 tsp. vanilla)
2 c. powdered sugar
White chocolate curls or finely chopped white chocolate chips

Directions:
1.Preheat oven to 325 degrees. Place paper lines in wells of muffin pan. Whisk flour and baking powder in small bowl.


2. Combine milk and vanilla in 1 c. measuring cup.


3. In medium mixing bowl, beat egg whites on high speed of electric mixer until stiff peaks form. In large mixing bowl, beat butter and granulated sugar on medium-high speed until fluffy; beat in sour cream until smooth (not pictured-I messed this step up...Ok, I'm not perfect!)

4. On medium speed, add flour mixture in three additions, alternating with milk mixture in two additions, mixing until smooth. Whisk in one-third of the egg whites with whisk. Fold in remaining egg whites using whisk. Using ladle or another large scoop, divide batter evenly among 12 liners.

5. Bake 17-20 minutes or until wooden pick inserted in centers comes out clean. Remove pan from oven to cooling rack (don't take out the cupcakes yet). Immediately snip a 1/2"-deep "X" into the top of each cupcake using kitchen shears.


6. Press one truffle into each cupcake until flush with top of cupcake. (Truffles will melt into cupcakes).


7. Remove cupcakes from cool. Cool 30 minutes or until room temperature.

8. Meanwhile, for frosting, melt white chocolate slowly either in microwave, stirring every 30 seconds, or in a double-broiler on a stovetop, stirring constantly (white chocolate seizes easily, so be careful). Let stand 3 minutes or until slightly cooled. In clean mixing bowl, combine melted chocolate, cream cheese, butter, and vanilla. Using clean beaters, beat on medium speed until well blended.


Slowly add powdered sugar; beat well.


Using baker's frosting bag, squeeze frosting onto cooled cupcakes. Top with white chocolate curls or chopped chocolate pieces. Enjoy!